I am always looking for activities that incorporate reading and writing in a fun way. When I saw this activity, I knew there was potential for a variety of learning. The Secret Message activity will expose your child to science, reading, writing, spelling, and even math. At the bottom of this post, I explain how to use this activity to expose your child to different subject matters.
This activity is quick, simple, and uses materials you probably have in your home. Get ready to share a surprise with your little one.
Many parents ask me how my son started writing at such a young age. He wrote his first letter A at 21 months. He could also write the alphabet and numbers 1-100 at the age of 2.5.
My son writing numbers 1-100 outside at 2.5 years old.Here’s a video of my son, age 2 at the time, writing the alphabet outside.
Teaching a child to write can be a difficult task, especially if the child does not have a desire to learn. Below I will answer the most frequently asked questions when it comes to handwriting skills and children. You will find creative and enjoyable teaching techniques in my new book, Fun and Easy Ways to Teach Your Toddler to Write.
It has over 135 activities, resources and tips for teaching writing with PLAY.
The Book is Available on Amazon in Paperback and Kindle! Click on the Image Below to Find It.
GO TO THE BOTTOM OF THIS POST TO GET THE FIRST CHAPTER AND HALF OF THE SECOND CHAPTER FOR FREE.
Let’s Get Started!
How Can I Help with Writing?
Part of learning to write involves remembering how letters, shapes, and numbers are formed. Most children are taught this through tracing letters, numbers, lines, and shapes repeatedly. Although this is very effective, there are other scientific-proven tricks that can accelerate the learning process and make it fun.
One Fun Scientific Trick to Use When Teaching Your Child to Write
One scientific trick I have used is called Picturing Information. I read about this method in the book, Learning How to Learn: How to Succeed in School Without Spending All Your Time Studying; A Guide for Teens and Kids. Picturing Information makes it much easier to remember. This involves using both the right and left brain strengths into learning. One way to do this is to convert a fact into a picture, so you can remember it more easily. If the picture is strange or unusual, it is easier to remember. Additionally, if the picture involves movement, then it makes the connection stronger.
Let’s use a letter as an example. If your child is learning to write the letter A, you may want to connect it with a picture of a triangle. While tracing or showing them how to write it, tell your child the A is part triangle with a line in the middle. It is important to use what is familiar to your child for the picture. In other words, ensure the child knows what a triangle and line look like. If they don’t know, then use another picture such as stick man legs with a line in the middle.
You may also describe an A as stick man legs with a line in the middle.
When should a child be able to write?
Most experts say that children learn to write between the ages of 3-6. I believe children learn to write before they actually start writing if exposed in the right way. This begins once a parent exposes their child to how letters, numbers, and shapes are formed through reading books, building, doing art, and participating in physical play. When children see letters, shapes, and numbers in books or in the real world often, their brain is taking note of how they are formed. When children start writing they will know letter and number formation which makes it easier to write.
How play can help In teaching your child to write
Building and doing art can help strengthen a child’s hand muscles to prepare them for writing. Building various structures with Legos, magnetic tiles, or Play-Doh helps develop a child’s pincer grasp, which is the coordination of the index finger and thumb to hold an item. This is also a great way to develop fine motor skills. A child is using the pincer grasp when they hold a paint brush, put money in a piggy bank, and learn to button their shirt.
Physical play is a great way to develop a child’s handwriting skills. Children can make letters with their bodies through creative dance. Also, crawling and yoga is a way to strengthen hand muscles which is beneficial for writing.
How can I help my child write faster?
Often I am asked how I got my son to write the alphabet and numbers as a 2-year-old. It wasn’t that he learned to write quickly, I just started earlier. When he was a baby, I read aloud to him various colorful children’s books about shapes, letters, and numbers. Not only was I reading to him, but I would take my finger and outline the shapes, letters, and numbers in the book.
We also built structures often with blocks and Play-doh. We created letters, shapes, and numbers with these toys and more. While creating we discussed our process in structuring each object and how they were formed.
So, if you want your child to write faster, simply start early through PLAY and fun exposure.
Fun and Easy Ways to Teach Your Toddler to Write Book
I wrote this book to show parents ways to expose their children to the formation of letters, numbers, and shapes in a fun way. This book will take you through a step by step process of how I taught my son handwriting skills. It gives you games/activities to do with your child along the way to make writing a process that is fun, natural, and stress free for the parent and child.
This is a great tool for parents with children ages 0-7!
This book provides the following and so much more…
Fun scientific techniques in teaching kids handwriting skills.
How to execute fun in-depth learning
How to teach children to write before they actually start writing
How to incorporate digital media in your child’s learning
The stages of writing
How to use PLAY when exposing your child to handwriting
The importance of learning in different settings
How to teach your child to hold writing utensils correctly
What to do when your child does not want to write
Hand strengthening activities that will prepare your child to write
Once your child begins to write, how to continue to build their handwriting skills
Here is What Others are Saying about the Book
This is a fantastic, thoughtful resource for anyone who wants to give their child a head start for school as well as cultivate a love for learning. It gives parents or caregivers who want to spend quality time with their child clear instructions and a wide variety of activities so they can strengthen their bond and create lasting memories with their child while teaching them valuable skills and having fun. An indispensable resource for those with young children! —Stacey K., editor and mother of 4
“This book is a fantastic resource for parents and educators in the midst of teaching their children literacy skills. It provides excellent activities, book references, and resources to teach toddlers how to write, along with educational insights regarding children’s brain development and cognition. I love how Andrea uses fun and creative literacy techniques to instill an early love of learning in young children. As a mom of two toddlers, I am excited to use these engaging techniques with my girls!” —Amber., counselor and mother of 4
This book is a great companion to Teach Your Toddler to Read Through Play. The book contains many activities for different learning styles. It is definitely not a one-size-fits-all approach to learning how to write. Parents and children can bond with each other and have fun while figuring out what works best for them. If your child enjoys nature, STEM, crafts, role-playing, or music, you’ll find something to pique their interests inside the pages. Not only does this book help your child learn to write, Andrea includes scientific insight about brain development to support the value of these child-centered and age-appropriate activities. Once again, Andrea has made learning fun! —Danielle J., Attorney and mother of 2
The Book is Available on Amazon in Paperback and Kindle! Click on the Image Above to Find It.
Not sure yet? Get a free excerpt of Fun Ways to Teach Your Toddler to Write by completing the form below.
One day, I was looking at the book, Crafty Science by Jane Bull. It has a bunch of STEAM projects for children to create at home. I showed my son the Invisible Ink activity and he said “Let’s do that mommy.” We looked around the house and gathered the materials.
I thought this would be a great drawing and writing activity for my son. He ended up writing numbers. This is a great project to expose your child to literacy and science. If your child is learning how to read, write words that will challenge them to use phonics or sight words. The science in this project is explained at the end of this post.
Let’s Get Started!
Invisible Ink
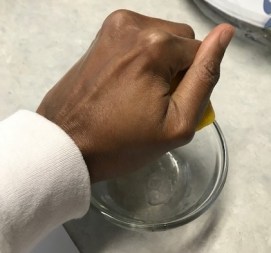
Materials:
Lemon
Bowl
Paintbrush or Cotton Swabs
Paper
Iron (for adult use only)
Materials for Invisible Ink Activity.
Method:
Squeeze a lemon into a bowl
Write your secret message on the paper in lemon juice using a paintbrush or cotton swab.
Draw quickly in order to check your work before it dries. It does not have to be as dark as the picture below. My son insisted on going over the numbers numerous times so he could see it.
To get the message, an adult should iron the paper with a hot iron until the message comes through
Warning:
This activity may stain your iron with brown spots. This happened to me. I was able to get my iron squeaky clean by following the video below.
Why this activity Works:
This works because lemon juice is an acid.
When it is put on the paper, the acid destroys some of the paper surface.
When you heat it up with the iron, the areas with the message turn brown first.
Milk also works with this activity because it is slightly acidic.
My son, like most young kids, loves to do activities that are hands-on. We have tackled a number of building activities from playing with Legos and Magnetic Tiles to Bristol Blocks.
When I realized that we had the opportunity to make our own 3-D paint, I became excited. However, my son had to sign off on the project. When he saw that we could make our own paint from scratch, he was all for it.
I like this activity because we had all the ingredients in the kitchen. Also, it was a great opportunity to practice writing and incorporate literacy in a fun way!
So let’s talk about our exciting scientific art experiment!
How to use this project to increase your child’s reading and writing skills
The project below will provide a fun and educational hands-on experience for kids. It is called the 3-D Puffy Paint Project and can encourage children to practice writing letters and numbers. This activity can be used to create stories and during pretend play. Additionally, constantly squeezing the paint out the bottle is a great hand strengthener to prepare kids for writing.
My son created a story while doing this project. The story was about a monster who played with friends. The monster started playing with one friend and then as time went on, the amount of friends grew exponentially. By the end of the story, the monster played with over 100 friends. We learned the words exponentially, introduce and exhausted, while doing this activity.
I exposed my son to new words by retelling the story. After my son told me the story, I said the following…
Me: So you are telling me that this story is about a monster who played with one friend at the playground. Then he kept meeting more and more friends as the day went on. This means his friends grew exponentially from 1 to over 100. Right?
My Son: Right
Me: As they were playing, he became very tired or exhausted. So how did he meet all those friends?
My Son: He went up to friends and said, “My name is Monster, do you want to play?”
Me: Oh, so the monster introduced himself to the new friends, and then asked them to play.
My son: “Yes, Yes, that’s right!”
Quick Tip: Use the new vocabulary as you are casually talking to your little one so they will internalize the information.
Another way to make this project literacy based is to have your child read the directions on this post while making the puffy paint. Encourage your child to sound out or say words that they know if they are beginning to read. If they can’t read yet, help them to use the pictures in this post to show how to make the paint. Your child will be reading because they are interpreting meaning. Additionally, read the instructions to them while following along with your finger so they see that words are needed in order to make the paint.
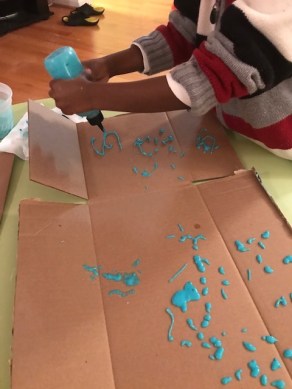
Now Let’s Make Paint that is 3-D!
Ingredients:
2 Tablespoons Flour (30 ml)
2 Tablespoons Salt (30 ml)
2 Tablespoons Water (30 ml)
Small Bowl
Food Coloring
Squeeze Bottle
Cereal-box cardboard
Method:
Mix flour, salt, and water in the bowl.
Measuring the flour, salt, and water with a measuring spoon.
Mixing flour, salt, and water in a bowl.
Add two drops of food coloring.
Mixing in blue coloring
Pour mixture into the squeeze bottle.
Make a few colors by following the first three steps.
Squirt lines, curves, dots, and PICTURES on the cardboard.
My son is having fun with the puffy paint.
My son is narrating and illustrating a story about a Monster playing with friends.
Make this a fun literary activity by doing the following…
Paint or draw a picture and create a story about the image.
Have the child practice writing their name.
Have the child practice writing their letters or numbers.
Writing letters and numbers is a skill that many parents and teachers ensure their children possess. My son wrote his first letter, A, at 21 months.He revealed it to me through abstract artwork that left me in shock.
Now he is four-years-old and his writing has improved tremendously. However, I like to find ways to make writing appealing and fun for him. One way to do this is through making our household, when possible, our writing canvas. This means writing in the tub with bath time crayons or writing on our screen door with window markers.
Today I will show you how we used household ingredients to write and create art. The project is called Pan Frescoes. Frescoes is painting with watercolor on wet plaster on a wall or ceiling.
In this project, we make our wet plaster with cornstarch and water! Instead of painting on a wall or ceiling, we will do it in a pan. You may also choose to do this outside on concrete. Just remember to rinse it with a water hose when done.
I am a big proponent of parents interacting and playing with their children. This is the secret of how I taught my son to write at two-years-old.
The method, In-depth learning, is what I used to teach him how to read and write. Before I give you the details, let’s answer some basic questions first.
How do I encourage my child to write?
One good way to encourage your child to write is to make it fun and purposeful for kids. Build a writing activity around your child’s interest. For example, if your child likes cars then have them construct letters in sand or mud with their toy vehicles. You can also create a road with tape in the form of letters. Then have your child follow the path with the cars. If you have a child that likes dolls or stuffed animals, then help them do a role play as a teacher teaching their dolls how to write.
Below are 5 more ways to encourage kids to write…
Get a pen pal for your child to write to frequently.
Help the child write a story about a topic of their choice.
Have the child write with their favorite toy (explained above).
Encourage the child to write with their fingers through finger paint or making letters in sand.
Writing well wishes to family members…
Creating and drawing Birthday, Christmas, or Get Well Cards to Family and Friends.
The book is available on Amazon! Click the image above to access the link.
Not Sure Yet? Then Complete the Form at the Bottom of this Post to Read the First Chapter and Half of the Second Chapter for Free!
How do I teach my child to write his name?
My son learned to write his name at the age of two. He first learned by seeing me write his name repeatedly during long car rides, church services, outside with sidewalk chalk and at the bottom of his art projects. He loved to trace his name with crayons after I wrote it. After seeing it done multiple times, I let him independently write the first letter of his name, then the second letter and so on.
When should a child start writing?
Children first learn to write once they have the strength to hold a crayon and scribble which is around 15 months. According to Zerotothree.org there are five stages of writing. The first stage, at 15 months – 2.5 years old, is when the child is doing random scribbling. Controlled scribbling is the second stage at 2 to 3 years old, when the child makes circles and vertical, curved, and horizontal lines. The third stage is lines and patterns, at 2.5 to 3.5 years old. Drawing pictures of objects or people is the fourth stage. In the fifth stage, children are using letters and numbers to write on their own.
My son’s brain starting processing the concept of writing around 13 months when he repeatedly observed me writing the alphabet and numbers. He was not able to physically write yet, but his brain recorded the loops, lines, and curves I made when I wrote. He wrote his first letter, A, at 21 months.
So, how did you teach your son to write at two-years- old?
There were many forms of playful methods used to teach my son to write. We still use some of the same methods and more to improve this writing skills. Below is what we did.
Play-Doh
Play-Doh is a favorite toy in our household. I used it to mold the alphabet before my son could talk. Constantly observing how letters are formed trained his brain to understand how they are MADE. Once he started talking, he would identify a letter and it was my job to make the letters. He gained a taste of leadership because he had control of what letter I wrote. Eventually, he combined the two skills and was able to identify the letter and shape them simultaneously with Play-Doh.
Form letters with various toys and objects
Play-Doh needed its own category because we used it frequently. However, we formed letters and numbers with other toys. We collected rocks and used them to shape letters and numbers in order. Legos and Magnetic Tiles were used to build the alphabet and create silly stories. The numbers we constructed using Gears were created by widgets, connectors and interlocking bases and were accessorized by the colorful gears and crank. We formed letters and numbers with poms and made them disappear by blowing on them.
My son played at a Legos table and created the numbers 1 – 10.
The letter B made from Magnetic Tiles.
Writing in different settings
In order to keep my son’s attention during road trips, church services or appointments, I would write letters and familiar words like his name and favorite animals. I also drew various shapes so eventually he would connect them to the construction of letters and numbers. For example, the letter A is part triangle with a line in the middle and O is an oval.
He observed me writing with various colors on the doodle pad, outside with sidewalk chalk, on the window with window markers, on notebook paper, on craft paper taped to the wall and floor. While I was writing, he would scribble and make abstract art. Then one day, he wrote the letter A!
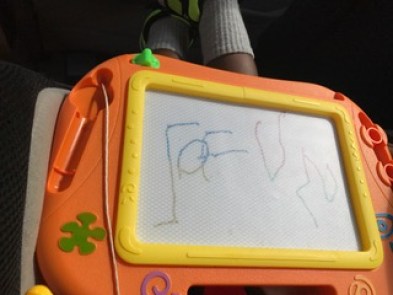
We were driving to an Amusement Park and my son wrote “So Fun” on his Doodle Pad because he was excited!
Observing the alphabet and letters in nature and the outside world
Broken crayons encourages children to pinch it between their thumb and index finger. As a result, he now holds the writing utensil correctly.
Another method is to use the alligator trick. Tell your child to hold their dominant hand like an alligator’s mouth. Have the child open and close the alligator’s mouth like they want to eat something. Then help the child hold the pencil like their hand or alligator mouth is closed on the pencil. The last step is to have your child bend their fingers a bit to grab the pencil.
Put it all together
My son was able to write independently at two-years-old. He loves writing his own thank you notes and birthday cards to family and friends. We are still improving his writing skills through play and fun activities. We have found that opportunities to write are endless and with this fun journey we will continue to move forward.
My son writing a note to his Uncle Linsey saying “I love you.”