Try this experiment with your kids!
You will see them become better learners overnight.
Watch the video below to find out how…
For 3 tips to 10x your child’s memory for school go to www.SoyLearning.com
Try this experiment with your kids!
You will see them become better learners overnight.
Watch the video below to find out how…
For 3 tips to 10x your child’s memory for school go to www.SoyLearning.com
“Can we do a science experiment?” This is what my 4-year-old son, Cory, asked me while walking in the grocery store one day. We just passed the aisle with vinegar, which is an item we use for many of our experiments. A week before, we did the Tooth Decay Experiment, which taught my son the importance of brushing his teeth twice a day. He had a lot of fun with this experiment and wanted to have that same feeling again.
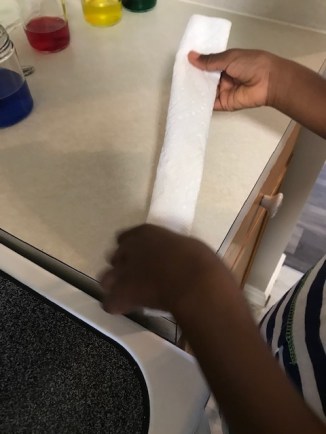
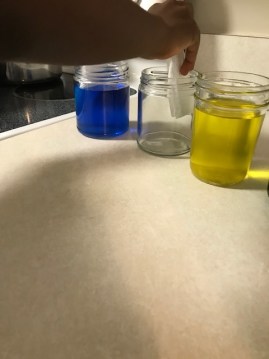
So I turned to him and said, “Sure we can do another experiment. Do you know what experiment you want to do?” His reply was, “No, but we can look one up.” We did just that the next day and found the Walking Water Experiment. I was familiar with how to do it without instructions. However, I wanted my son to read the experiment instructions and follow directions. Science experiments are a great way to increase a child’s reading level.
We looked in our kitchen for the materials needed to do the Walking Water Science Project. We had everything except food coloring. Cory was so excited to do the experiment that he requested we go to the grocery store to get it. When my son is excited to learn something new, I try to act on it as fast as I can. After we got home from the grocery store, we were ready to get started.
This is an amazing experiment to show how water can defy gravity with a capillary action. I will explain this at the end of the post.


Our books are available on Amazon, “Teach Your Toddler to Read Through Play,” “Fun Easy Ways to Teach Your Toddler to Write, and “Teach Your Child About Money Through Play.“
THE TEACH YOUR TODDLER TO READ THROUGH PLAY ONLINE COURSE HAS A $97 DISCOUNT.

I have always admired people, young and old, who can play the game of Chess. Throughout my life, I have heard the many benefits of playing this strategic game. Also, people who play Chess seem intelligent to me.
Honestly, I have tried three times to learn chess and failed. It was the time and energy it took to learn the name of the pieces and how they moved. I would read or watch online videos about the game and eventually become bored.
The idea of tackling Chess again came from my mother. One of her gifts for my son’s third Christmas was a Chess game. It was the same cycle again.
I read the book that came with the game she gave my son and I got bored. Additionally, I thought my son was too young to learn the game. However, in the back of my mind, I knew Chess would be a game that he would like because it challenges the brain.
My decision was to wait until he got a little older to introduce him to the game.
My future plan was to take him to some type of community program that would teach him how to play Chess. Then, maybe I would learn through him. This was a win-win situation!
It wasn’t until one night while skimming Facebook, I saw an advertisement for Story Time Chess. After seeing the advertisement’s picture of young kids playing chess with their parents, I wanted to learn more. On the website, I saw these words, “A revolutionary new game that lets you teach your child how to play chess as young as the age of 3!”
It is revolutionary because it teaches kids to play through fun stories with colorful diverse characters instead of rules. Each piece has a story about how it moves. Each piece holds a character’s picture from their story which allows children to visually connect it to the chess board and understand how to play.
Another helpful aspect of Story Time Chess is each story is concluded with a mini game that reinforces how the pieces move.
We love it! My four-year-old son and I learned how to play chess within a week and a half of opening the game! He was highly motivated to learn because of the engaging stories and pieces in the game. We currently play almost daily. Sometimes, he wins and other times I am the victor.
Watch the two videos below of my son and I playing chess. The first video is footage of us playing a game. The second one shows my son winning against me in the game of Chess.
Below I will answer frequently asked questions parents have about Chess. It will be through the lens of our experience.
The programs that I have researched in my local area start teaching kids chess at the age of seven. However, I have seen kids learn chess as young as five-years-old. My son learned how to play through Story Time Chess as a four-year-old. However, if I’d known about this game earlier, our starting age would have been three.
If your kids love fun engaging stories with colorful characters, they can learn at an early age.
Of course you know the easiest way for us to play chess was to learn through Story Time Chess. We learned how the pieces moved in this order: king, pawns, knights, rooks, bishops, and queen. There were mini games at the end of each story that gave us a hands-on perspective on how each piece moved.
The best way to learn is be consistent with playing. It is important to learn the basic steps first and then take it a step further by learning various strategies.
We play daily which helps to hone our skills and learn new strategies.
Chess teaches children so many important skills. I will concentrate on three skills below.
Chess teaches kids problem solving skills. During our games, my son spends time concentrating on how to keep his king safe while capturing mine. I can see him thinking about and planning his next move.
It also increases your child’s creatively. There is one piece my son loves to use when capturing my king. When I take that piece away from him, he has to be creative and think outside the box to win the game.
Chess has improved my son’s memory and observation skills. I use a particular strategy to win games against him. One day, I noticed he began to remember my first three moves while playing. He told me what the moves were and asked why I always did that. Then he developed some strategy to counter my moves. Amazing!
Our books are available on Amazon, “Teach Your Toddler to Read Through Play,” “Fun Easy Ways to Teach Your Toddler to Write, and “Teach Your Child About Money Through Play.“
THE TEACH YOUR TODDLER TO READ THROUGH PLAY ONLINE COURSE HAS A $97 DISCOUNT.
I have parents approach me asking how to keep their child focused when learning something new or doing school work. This is something that we all face from time to time as parents.
Children can lose their focus for a number of reasons including…
Below are some tips that have helped in our household. Please share your tips in the comments below.

Our brains start to lose optimal focus after 25 minutes. Therefore in order to have optimal concentration, try to break tasks into 25 minutes of focused blocks of time. This is also called the Pomodoro Technique and will help your child focus on the task at hand. After 25 minutes has ended, have your child take a break. After the break, they can come back to the task for another 25 minutes.
When reading a book, we tend to remember the beginning and ending for longer periods of time. Also, when we watch movies, it seems like the start and end of the story sticks in our brain. The proper terms for these occurrences are the primacy and recency effect. Primacy Effect is when you remember things at the beginning of the list because it happened first. The Recency Effect is when you remember the end of the list or an occurrence.
Remember we said the brain starts to lose optimal focus after 25 minutes. When you combine your knowledge of the Pomodoro Technique, Primacy, and Recency Effects, it makes sense to create more beginnings and endings. You may accomplish this by taking more breaks. Your child will remember more because there are more “firsts and lasts” bits of information that will stick in their brain.
Many of us want to put ALL the blame on our children for NOT having better focus when it comes to school or learning something new. However, I think we have to look at our role in the matter as well.
For example, I wanted my son to have better focus in the morning while getting dressed for school. We were always rushing to get ready for school. The problem was I often got out of bed late causing him to rush. He is the type of child that gets the tasks done but likes to takes his time to do it.
Once I started getting up earlier in the morning, he seems to have more focus.
For the days when he needs to move a little faster, I created some games/activities to make our morning routine efficient and effective.
As far as studying, it is effective to make the information more relevant to your child and break it up into smaller tasks. We will talk about this in the next point.
Sometimes children find a task so daunting that it is difficult for them to sit for 25 minutes. This is where Shaping can help save the day. Shaping is a technique many counselors use to teach kids new behaviors. It allows you to build a desired behavior in children using small steps. Once the child has mastered a step then you move to the next one.
If it is difficult for your child to focus for 10 minutes, have them try five minutes. If they are successful next time, add one or two minutes to the next session. Keep doing this until you have reached the desired 25 minutes. Also, give your child small rewards for completing a task. It will help keep them motivated.
I remember being in school thinking to myself, “Why do I have to learn this?” Some of the information we learned as children have never been used in our adult lives. However, learning something new strengthens your brain and puts you in better mental shape to be creative and work on your passion. When your child does not see the point in what they are learning, request that they be creative and make it relevant by using the Chain Linking technique. Chain linking is a memory technique that allows your child to use their imagination and creativity to link facts to pictures and stories.
Chain linking is a great way for your child to take charge of their learning because they are creating the factual links to pictures and stories. When they create ways to remember information, they have more of connection to it. It also helps them learn information faster in a fun way.
When your child tells you a task is too hard, talk to them about the Power of Mistakes and its importance in learning.
I hope you find this helpful!
It is warm outside and kids are going to the beach (where there is salt water) and the pool. Some kids may notice that they float better in salt water than in fresh water. After doing this experiment, your child will know why this occurs. Explore the difference in density between salt water and fresh water with this easy experiment.


Don’t forget to check our two books, Teach your Toddler to Read Through Play and Fun and Easy Ways to Teach your Toddler to Write.
Many parents are successful at teaching their children manners through modeling the behavior or reminding kids to use them. This post brings a fun, hands-on approach to teaching manners. The games/activities below can be a supplement to what you are already teaching your children at home. These are great group activities to play with young kids. I hope you find these helpful!

The following game will teach your child when to say Please and Thank you.

This activity gives kids a reminder to cover their mouths when they cough and sneeze.

This game will teach your child when it is appropriate to say Excuse Me.

This activity uses the concept of Shaping to teach kids to be patient while parents are talking to others in person or on the phone. Shaping is a technique many counselors use to teach kids new behaviors or skills. It allows you to build a desired behavior in children using small steps. Once the child has mastered a step, then move to the next one.

Did you know that science experiments can make children better readers? The book, The Three R’s by Ruth Beechick, which is about early childhood learning supports this fact.
In this book she talks about an experiment where some kindergartners in a school district received extensive instructions in reading while the others spent the same amount of time learning science.
The kids that learned science melted ice, observed thermometers in hot and cold places, played with magnets, grew plants and learned about animal life. Books and pictures were available for these children but no formal lessons in reading were held.
The school district learned that by the third grade the “science” children were far ahead of the “reading” children in their reading score. The reason is their vocabulary and thinking skills were much more advanced. They could read on more topics and understand higher levels of material. The playful, hands-on activities the “science” children did taught them analytical and problem solving skills and how to make connections in what they were learning.
Here is book excerpt here…

This is why I think EXPOSING KIDS TO NEW WORDS AND READING THROUGH PLAY IS A GREAT CONCEPT.

To incorporate literacy in this experiment, help your children read the Materials, Method, and Why it Works headings in this post. As kids are reading these sections, have them do the action. Children can use the pictures to help them read the words. If your children can read independently allow them to do so.


Have fun experimenting!
Resources:
Easy Art Fun Do-It-Yourself Crafts for Beginning Readers by Jill Frankel Hauser
Our books are available on Amazon, “Teach Your Toddler to Read Through Play,” “Fun Easy Ways to Teach Your Toddler to Write, and “Teach Your Child About Money Through Play.“
THE TEACH YOUR TODDLER TO READ THROUGH PLAY ONLINE COURSE HAS A $97 DISCOUNT.
Click here for the PAYMENT PLAN OPTION!