One day my son came home from daycare with DIY Slime. He could not wait to show it off after he greeted me with a kiss and hug. It was in a yellow container and sparkled with glitter.
We decided to take the slime out the container to play with it. It was sticky, slimly, ooey, gooey, and fun to play with. We smashed and constructed it in to various shapes.
About 30 minutes before dinner, we decided to make up an activity called the Slime Time Game. The game is simple and will encourage your child to think on their feet while being creative. This is a great indoor activity for rainy and cold days. Below I will explain how to play.
My son loves science experiments that are messy and incorporate mild explosions. When I saw this experiment, I knew we had to do it. Like many of the science experiments we do, all the ingredients were in our home.
We liked this activity because it was simple and fun. It requires you to use boiled eggs. I used this as an opportunity to expose my son to the science of cooking. While boiling the eggs, we discussed how cooking is transferring energy from a heat source, the stove, to the food. In other words, heat changes food.
One day my son and I were watching the Temperature Investigation episode of Sid the Science Kid cartoon. Cory was two-years-old the first time he watched it. After the episode ended, we decided to do the science experiment showcased on the cartoon. My son learned a lot about thermometers and temperature change during this activity.
Fall is coming soon and our children will witness a drop in temperature. Do this simple experiment at home to help your child learn about temperature changes in nature. I am pretty sure you have all the materials in your kitchen.
One day my son, Cory, and I were walking outside and we saw that one of our neighbors had a wooden bird house hanging on their tree. Cory stopped to observe the house and said “Mom can we make that?” Afterwards, we searched the Internet trying to find the perfect bird home to build.
Then we came across a bird feeder that involved peanut butter, toilet paper roll, and bird seeds. Cory saw it and said “I would like to make this!” I told him it was a bird feeder and not a home. He still wanted to make it.
We had all the ingredients in our home. Surprisingly, my husband had bird seeds. After gathering all the materials, we started to make our bird feeder. We had fun with this activity.
This project also taught us a very important lesson of recycling.
I will show you how below…
Let’s get started!
Materials:
Toilet paper roll
Bird Seed
Nut Butter (we used Almond Butter)
String
Paper Plate
Plastic Knife
Materials for bird feeder
Method:
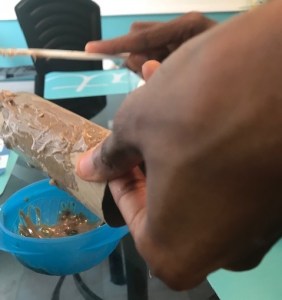
Spread nut butter on the toilet paper roll.
Put bird seed in paper plate.
Roll toilet paper roll in the bird seed until it is covered.
Thread the string through the toilet paper roll and knot the string.
Hang the bird feeder on a tree branch so birds can access it.
More Learning
Congratulate your child for recycling the toilet paper roll and using it to feed birds.
Talk about the importance of recycling.
Find other items around your home to recycle or reuse.
Try to capture a picture of birds eating from the bird feeder.
Tell your child why birds are important to the environment.
Birds spread seeds for plants that provide humans with food and medicine.
One day I got an email from Kiwico.com about DIY science experiments. I saw directions on how to make giant bubbles. I could not wait to show my son, Cory, the bubble activity. Once he saw it, he was excited to get started.
We had all the materials in our home except one item, push pins. We immediately went to the store and purchased the push pins and started to build the wand for the giant bubbles.
If you do this activity once with your child, it will not be your last. So far, we have done the activity three times. The first time, Cory was excited at how big the bubbles were. However, we wanted them to be bigger. So like scientists, we tested and adjusted our approach. The second time was even better than the first.
So let’s get started with how to do this fun activity.
Below is a video of how it is done. This video comes from my son’s YouTube Channel, Corban’s Fun Learning Adventures. Please like and subscribe for weekly fun learning activities. There are also written directions below for Giant Bubbles.
Gather materials to make the giant bubble wand and bubble solution.
Start creating the giant bubble wand by sticking a pushpin into the end of each dowel. Don’t push it in all the way but keep the pin about a 1/8-inch from the dowel.
We put the pushpin in about 1/8 inch from the dowel.
Cut a piece of yarn about 4 feet long.
Tie one end of the yarn to the exposed metal part of the push pin.
Push the pin into the dowel to hold the knot
Thread the yarn through the washer.
Tie the other end of the yarn around the push pin on the second dowel.
Push the pin in to hold the knot.
Cut a shorter piece of yarn that’s about 18 inches long.
Tie the ends to the longer yarn a few inches away from the dowels.
This should create a triangular shape.
Now it is time to make the bubble solution.
Mix 1 part dish soap, 4 parts warm water, add a teaspoon of glycerin, and stir well.
Using the dowels, dunk the yarn and washer into the solution.
Lift up the dowel and hold it out so the triangular shape opens up.
Walk the dowel around to see the giant bubble take form.
We liked these bubbles but wanted them bigger.
Therefore, we made some adjustments.
We made the yarn longer by cutting it 6 feet instead of 4 feet.
My husband provided us with a bigger and heavier washer.
The shorter piece of yarn was cut to 30 inches instead of 18 inches.
We used Gazillion Bubbles because we did not have time to make our own bubble solution.
We also learned that bigger bubbles will pop MORE often in hot and dry weather. This weather makes the water in the bubble evaporate too quickly which causes the bubbles to pop.
In the picture below, it was cloudy and rainy outside.
My son loves balloons! He likes to inflate, toss, and hit them. So, when I saw this experiment, I knew we had to do it! This is a perfect activity for July 4th festivities!
You probably have all the materials in your home. Once your child does this activity, they will want to do it repeatedly. Have fun with this simple yet exciting activity!
You may watch us do this activity in real time in the video below. This video comes from my son’s YouTube channel, Corban’s Fun Learning Adventures. Please like and subscribe for fun learning activities.
Materials:
String
Balloon
Wide Straw
Tape
Two Chairs or Two Trees
Method:
Cut string about several feet long
The string will be the track for your balloon launch.
Cut the straw about 4″ long
Thread the string through the straw
String it through the straw
Tie the two ends of the string to two chairs or two trees
We tied the strings to two chairs
Blow up the balloon
Cory blowing up the balloon.
Pinch the opening of the balloon to keep the air inside
Tape the straw to the balloon.
You made need two people to help with this step.
We taped the straw to the balloon.This is the second try. We taped the straw to the balloon. The yellow balloon burst on us.
Go to one end of the string and let go of the balloon opening
Pool Boats is a simple, yet scientific activity to do with kids inside or outside of the home. This activity came about because my son had a fever and could not go outside. Although he had a fever, he still had a desire to play. So, we did this activity.
A week prior, my son asked me for a bathtub boat but we did not have one at the time. So, I started doing research on how to make a simple DIY boat at home and came across this activity at the library. We had coins and aluminum foil at home and my son said “Let’s do this now!”
I encourage you to do this activity outside! It is more fun this way, in my opinion! Additionally it is a great activity to teach your child about buoyancy.
Let’s Get Started!
Materials:
Kiddie Pool or Bathtub filled with water
Coins
Four 12 x 12 inch (30.5 x 30.5 cm) sheets of aluminum foil
Method:
Fill the pool or bathtub with water.
Put a flat piece of aluminum foil in water, edge first, and watch what happens.
Crumble up the second piece of aluminum foil.
Drop the foil in the water to see whether it floats or sinks
Form another piece of foil into a boat to see whether it will float
Our crumbled foil and foil boat are floating
Put coins into your foil boat. Determine how many coins you can add to the boat before it sinks.
Redesign your boat with another piece of foil to see whether you can get more coins in before it sinks.
My son decided to destroy the boat to see if it would sink.
In this picture he destroyed boat and it did sink.
The Science behind this activity
Buoyancy is the ability to float.
To make an object float that would not normally, your child has to change its shapes so it pushes out its own weight in water.
A flat sheet of foil is denser than water and sinks if you put in the edge first.
When you change its shapes to a boat, it pushes more water out of the way and can float.
Adding coins to the foil boat increases the weight of the boat, and when it get too heavy, it sinks.
The crumpled foil traps air inside the foil ball and makes it buoyant.
Tell your child that life jackets work the same way.
Life Jackets keep you afloat in water because it contains a lot of trapped air.
Other Activities to try
Test the buoyancy of other materials such as wood, plastic, and rock.
Compare what happens when you put a water balloon in the pool versus an air-filled balloon the same size.
It is warm outside and kids are going to the beach (where there is salt water) and the pool. Some kids may notice that they float better in salt water than in fresh water. After doing this experiment, your child will know why this occurs. Explore the difference in density between salt water and fresh water with this easy experiment.
Let’s Get Started!
Materials:
2 Glasses of Water
Salt
Spoon
Food Coloring
Ice
Materials for Salt and Fresh Water Experiment
Method:
Place a few ice cubes into one glass of water
Placing ice in fresh water
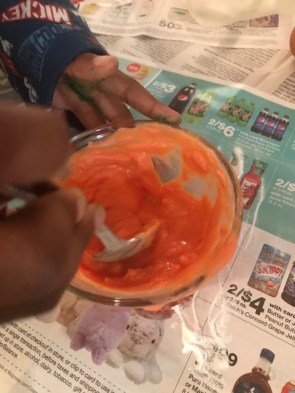
Add a few drops of food coloring into the ice water.
Adding green food coloring into the ice fresh water.Observing how the green food coloring disperses into the fresh water.
Add several tablespoons of salt to the other glass of water and stir so it dissolves.
Add some ice cubes to the salt water glass.
Pouring salt into the other glass of fresh water
Add food coloring to the salt water and see what happens.
Adding food coloring to the salt waterThe salt is causing the food coloring to float.
Compare the food coloring in the fresh and salt water.
Observe the difference.
Why it Works:
Saltwater is denser than fresh water because the sodium chloride is dissolved in it.
Specific amounts of salt water is heavier than the same volume of freshwater.
When salt is dissolved in water, like at the ocean, the salt adds to the mass of the water.
The salt makes the water denser than it would be without the salt.
When salt is dissolved in water, as it is in ocean water, it adds to the mass of the water and makes the water denser than it would be without salt. Because objects float better on a dense surface, they float better on salt water than in fresh water.
One day, I was looking at the book, Crafty Science by Jane Bull. It has a bunch of STEAM projects for children to create at home. I showed my son the Invisible Ink activity and he said “Let’s do that mommy.” We looked around the house and gathered the materials.
I thought this would be a great drawing and writing activity for my son. He ended up writing numbers. This is a great project to expose your child to literacy and science. If your child is learning how to read, write words that will challenge them to use phonics or sight words. The science in this project is explained at the end of this post.
Let’s Get Started!
Invisible Ink
Materials:
Lemon
Bowl
Paintbrush or Cotton Swabs
Paper
Iron (for adult use only)
Materials for Invisible Ink Activity.
Method:
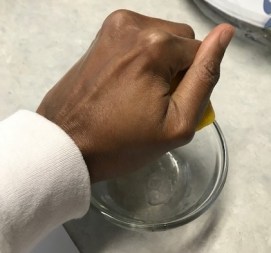
Squeeze a lemon into a bowl
Write your secret message on the paper in lemon juice using a paintbrush or cotton swab.
Draw quickly in order to check your work before it dries. It does not have to be as dark as the picture below. My son insisted on going over the numbers numerous times so he could see it.
To get the message, an adult should iron the paper with a hot iron until the message comes through
Warning:
This activity may stain your iron with brown spots. This happened to me. I was able to get my iron squeaky clean by following the video below.
Why this activity Works:
This works because lemon juice is an acid.
When it is put on the paper, the acid destroys some of the paper surface.
When you heat it up with the iron, the areas with the message turn brown first.
Milk also works with this activity because it is slightly acidic.
My son loves to play, build, and race his toy cars. One day, I asked him if he wanted to have a car wash after seeing this activity on the Internet. I remember looking at this activity and thinking this would be a great idea for a kid who likes cars.
I had several reasons for suggesting the car wash. First, this activity was a fun way to encourage my son to practice his penmanship. The weekend we did the activity, it was raining. I was trying to find something hands-on to do in the house; although, a car wash is really fun when doing it outside on a sunny day. Furthermore, I wanted to incorporate three things that interest my son which are cars, counting, and getting messy.
Our Car Wash incorporated fun and so many aspects of hands-on learning. I thought I would share this activity with you so your kids can have as much fun as my son.
Check out our new book available on Amazon, Teach Your Child About Money Through Play! It has over 110 Games/Activities, Tips, and Resources. The book is great for kids ages 4-10 and their parents.
Let’s Get Started
Materials:
Big sheet of poster board or white craft paper
Toy Cars
Markers
Painters Tape
Towels (3)
Wash Cloth
Cash Register or Play Money (You may also make your own play money)
Two Rectangular Plastic Containers
Water
Dish Detergent
Some of the materials for the Car Wash
Preparation:
Have your child decide the Car Wash Prices.
If your child can write, have them write the car wash prices on the poster board or white craft paper.
My son decided to give each color car a different price.
If your child can’t write, you may create the Car Wash Price Sign for them.
You may have your child draw the various colored cars on the sign.
I created a template on construction paper to assist my son in organizing the Car Wash prices on the white craft paper.
My son writing the Car Wash Prices using the template I created on pink construction paper.Continuing to write the pricesCar Wash Price Sign is complete.
Tape the Car Wash Prices to a wall where it is visible for customers.
Car Wash Prices taped to the wall.
Get the toy cars, cash register, wash cloth, and towels
Lay the towels on the floor if you are doing this in your home.
If you are outside, then you can skip this step.
Fill one rectangular plastic container with dish detergent and water halfway.
This is where you will wash the cars
Fill the other rectangular plastic container with water.
This is where you will rinse the cars.
Now the Car Wash can Begin!
Have your child role play the Car Wash owner.
You or your child’s siblings and/or friends can play the customers.
As a customer, get some play money so you can pay to get your car washed.
I started off with $30.00 divided into (10) one dollar bills, (2) five dollar bills, (1) ten dollar bill
My son giving me money to start the Car Wash Activity.
Have your child say the following:
“Welcome to the Car Wash, how may I help you?
You will respond by saying the following…
Yes, I would like to have my yellow cars washed please.”
Then your child will look at the poster they made to see how much it costs to wash the yellow cars.
On our poster, it costs $2.00 to wash the yellow cars.
I had three yellow cars, so I gave him $6.00 with (1) five dollar bill and (1) one dollar bill
Exchanging money during the Car Wash Activity
Sometimes I gave him more money than the cost of washing the car so he could practice his subtraction skills and give me change.
After giving my son the money, he took the cars and washed them.
He washed them in the soapy water container and then put them in the container with water to rinse.
Next he put them on the towel to dry.
My son washing the cars.My son rinsing the cars.
We kept repeating these steps until all the cars were washed.
Another time we did this activity, I was the Car Wash Owner.
We have also done this activity where my son was the Cash Wash Owner for the red cars but I was the Cash Wash Owner for the blue cars.
In other words, we were alternating roles.
Tailor this activity to your child’s ability by doing the following…
Have your child wash only one car at a time so they don’t have to do any subtraction or addition.
Only give your child one dollar bills so they can practice counting by ones.
Make all the car wash prices the same to make things easier.
View the video below to see us do this activity in real time. This video comes from my son’s YouTube channel, Corban’s Fun Learning Activities. Please like and subscribe for fun learning activities.
Subjects Learned in this Activity
Color Recognition
Sort the cars by colors.
Make different prices for each color car.
You may also have a car wash with one color car like the red cars.
Math
Adding the costs to wash multiple cars.
Subtracting when the customer gives the Car Wash Owner too much money and change is needed.
Multiplying the cost when multiple cars with the same price are needed to be washed
Science
We had some cars that would float in the water and some that would not
We discussed that cars with less density than the water will float.
Cars with more density than the water will sink.
We reviewed the word buoyancy, which is the ability to float in water.
You may discuss the science of soapy water and how it cleans the cars.
Soap attaches to dirt and grease and causes it to be pulled off the toy cars and suspended in the water
Writing
My son was able to practice his handwriting skills in creating the Car Wash Price Sign.
Customer Service
Teach your child the importance of being nice and respectful to their customer.
Also ensure your child knows to clean the cars well so the customer is happy.
If the customer is happy then they will bring more customers.
Entrepreneurship
Explain to your child that Entrepreneurs own businesses and their purpose is to solve problems or make things better.
A great business has happy customers who will tell others about their service or product.
Take your child to a real Car Wash and show them it is a Real Business.
Have fun with this activity and make this your own!