Fun & Simple Science Experiment to Teach Kids About Germs

For the past six weeks, our country has been in quarantine due to Covid-19. During this time, my son and I have used our creativity to make up fun activities to do in our home.

We have spent a lot of time doing Science Experiments, playing games, learning, and enjoying the warm weather outside.

One day my son was looking on the Internet and saw the Pepper and Soap Experiment. After viewing the instructions for this experiment, he ran in the kitchen and told me that he wanted to do it. I was familiar with the experiment because I saw it about a month ago on Facebook and was planning to do it with him in the future.

However, he requested that we do the Pepper and Soap Experiment that day. My son was excited because he wanted to add his own twist to the experiment.

How Does It Work?

In this activity, germs are represented by pepper. In demonstrates how soap is used to repel those germs and wash them off your hands.

We knew pepper would work in this experiment. However, my son took it a step further and discovered three more spices/seasonings that worked and why all four were successful.

I was proud of my son because he tested all the spices/seasonings in our kitchen. He calls his new discovery, THE SURPRISE SPICES.

We like the experiment because it is fun and simple. You most likely have all the materials in your kitchen.

Additionally, it is a wonderful way to explain to children the importance of washing their hands with soap. This skill is especially important now that Covid-19 is among us.

If you want to see how the experiment is done and THE SURPRISE SPICES, please view the video below. It comes from my son’s YouTube Channel, Corban’s Fun Learning Adventures. Please like and subscribe to support the channel and for fun learning activities.

Enjoy This Activity!

OUR KID FRIENDLY FAST & FUN STUDY TRICKS FOR BETTER GRADES: 9 FUN STRATEGIES FOR SUCCESS IN LEARNING AND SCHOOL HAS $29 OFF THE ORIGINAL PRICE.

Our books are available on Amazon, “Teach Your Toddler to Read Through Play,” “Fun Easy Ways to Teach Your Toddler to Write, and “Teach Your Child About Money Through Play.“

THE TEACH YOUR TODDLER TO READ THROUGH PLAY ONLINE COURSE HAS A $97 DISCOUNT.

How To Do 3D Salt Art Painting for Kids -Simple and Fun

My son is generally excited to do most of the art projects I present to him. However, there are some art projects that don’t appeal to him. This is why I generally let him choose his own as a way to promote interest-led learning.

When I showed my son the 3D Salt Art Painting craft, he was not thrilled to do it. I requested that we try one, just to see if liked it. He agreed.

Once we tried one Salt Art Painting, he wanted to do more. In fact, he did a total of four pictures in one session. This really surprised me! After doing the first picture, he asked if we could make a video showing others how to do it. I said “yes.”

My son has a YouTube channel called, Corban’s Fun Learning Adventures. On his channel he shows kids and parents how to do his favorite science experiments, art projects, pretend play scenarios, and to play with fun games and toys. He is learning new concepts, such as math and vocabulary, while doing all these activities.

Three of the Salt Paintings he made were freestyle writings and drawings. We used a drawing book called, Draw AlphaBeasts by Steve Harpster. This book shows children how to draw 130+ monsters, aliens and robots from letters and numbers. I wrote another post called Draw Monsters Out of Letters and Numbers featuring this same book.

We liked this activity because we had everything we needed at home. Try this activity! Your children may be like my son, and want to do multiple paintings.

Below is a video of my son doing the 3D Salt Art Painting. It comes from his YouTube channel, Corban’s Fun Learning Adventure. Please subscribe and like for more fun learning activities!

We hope you have fun with this activity!

OUR KID FRIENDLY FAST & FUN STUDY TRICKS FOR BETTER GRADES: 9 FUN STRATEGIES FOR SUCCESS IN LEARNING AND SCHOOL HAS $29 OFF THE ORIGINAL PRICE.

Our books are available on Amazon, “Teach Your Toddler to Read Through Play,” “Fun Easy Ways to Teach Your Toddler to Write, and “Teach Your Child About Money Through Play.“

THE TEACH YOUR TODDLER TO READ THROUGH PLAY ONLINE COURSE HAS A $97 DISCOUNT.

Letter Recognition & Word Game for Preschoolers, Kindergarten, and Up

Letter Recognition and words are one of the first concepts children learn when starting school. Letter recognition can be perfected by singing the Alphabet song, reading books, watching educational shows, and by simply playing with letters. Children often become familiar with words by reading, spelling, playing word games, etc.

My son and I have used all the methods mentioned above to get him familiar with letters and words. This time we decided to do something different. We created a fun activity called the Blindfold Alphabet and Word Game.

This game starts out easy with letter recognition but then gets harder with spelling words. The unique part of this game is that you have to identify letters and words with a blindfold.

We had so much fun playing this game. There was a lot of laughter during this activity. This game is a great way to reinforce letter recognition, how letters are formed (which is beneficial for handwriting skills) phonics, and spelling.

My son and I made a video of us playing the Blindfold Alphabet and Word Game. We had a friendly competition. You will see us having fun while learning. Watch the video below to see who won the game. Have your children participate while watching by identifying the letters and words with us.

The video below comes from my son’s YouTube channel, Corban’s Fun Learning Adventures. Please like and subscribe for other fun learning activities.

We used foam alphabet letters for bathtub in the video below.

Enjoy playing this game with your family!

OUR KID FRIENDLY FAST & FUN STUDY TRICKS FOR BETTER GRADES: 9 FUN STRATEGIES FOR SUCCESS IN LEARNING AND SCHOOL HAS $29 OFF THE ORIGINAL PRICE.

Our books are available on Amazon, “Teach Your Toddler to Read Through Play,” “Fun Easy Ways to Teach Your Toddler to Write, and “Teach Your Child About Money Through Play.“

THE TEACH YOUR TODDLER TO READ THROUGH PLAY ONLINE COURSE HAS A $97 DISCOUNT.

Take our free mini course on How to Teach Alphabet Recognition in a Fun Way by completing the form below. It has over 100 activities.

Ice Cube Melting Experiment – Fun and Easy

A Love for Science

My son, Corban, loves to do science experiments. Science experiments are a fun way for kids to get their hands messy and to understand how the world works. I have learned a lot through doing these activities as well. For example, I got a better understanding of Newton’s Law of Motion from doing the Colorful Egg Drop Science Experiment for Kids.

Because of our many scientific encounters, I decided it was time to get my son tools such as beakers, test tubes, funnel, and safety goggles. I did not want to purchase these things separately so I got the Educational Insights Geo Safari Rockin’ Reactions Chemistry Set. It includes the following: beaker, 4 test tubes, test tube rack, graduated cylinder, lab glasses, dropper, funnel, stirring rod, and 22-page activity journal.

Fun and Easy

As soon as we got the kit, Corban looked through the activity book at the various experiments. He decided to do Ice Cube Melting Experiment aka Disappearing Ice. I like this experiment because you don’t need fancy science tools. You can use materials you have in your home. In fact, we shared a video of my son doing this experiment with a friend. About 30 minutes later, I get a video text with my friend with her daughter doing this experiment with drinking glasses and ice.

I encourage you to try this easy activity. It will show kids that when two or more chemicals are mixed together, amazing things can happen.

Corban has created a video showing you how to do the experiment below.

Let’s Get Started

MaterIALS NEEDED:

  • 1 funnel (optional)
  • 1 test tube (an alternative is a drinking glass)
  • 2 (more) drinking glasses or plastic cups
  • 2 ice cubes that are about the same size
  • regular table salt

Watch Corban demonstrate the Disappearing Ice/Ice Cube Melting Experiment. It is a great activity to teach kids why, in snowy regions, workers put salt on the road to make them safer for drivers. The video comes from my son’s YouTube channel called Corban’s Fun Learning Adventures. Please like and subscribe for fun learning activities!

Have fun discovering how chemistry helps keep drivers safe.

OUR KID FRIENDLY FAST & FUN STUDY TRICKS FOR BETTER GRADES: 9 FUN STRATEGIES FOR SUCCESS IN LEARNING AND SCHOOL HAS $29 OFF THE ORIGINAL PRICE.

Our books are available on Amazon, “Teach Your Toddler to Read Through Play,” “Fun Easy Ways to Teach Your Toddler to Write, and “Teach Your Child About Money Through Play.“

THE TEACH YOUR TODDLER TO READ THROUGH PLAY ONLINE COURSE HAS A $97 DISCOUNT.

Colorful Egg Drop Science Experiment for Kids

About a week ago, many families were coloring eggs to prepare for Easter Egg Hunts. This can be a fun and interactive process for children. I knew my son would love coloring eggs this year and we did just that. However, we decided to do something different. We incorporated a magical science trick while coloring our eggs.

It is called the Colorful Egg Drop Science Experiment for Kids. My son saw this experiment in a book and could not wait to try it. He immediately searched our home for the materials to execute this amazing scientific trick.

I was a little skeptical at first because I didn’t think it would work. However, to my surprise, it was successful on the first try! My son wanted to do the experiment repeatedly after it worked the first time.

I love this experiment because it required materials I had at home, it was quick and easy to set up, it taught my son about Newton’s Law of Motion and gravity, and it colored our eggs for Easter in a fun way!

Below my son will teach you how to do this fun experiment.

Let’s Get Started!

Materials Needed:

  • Two toilet paper rolls
  • Three cups of water
  • Food Coloring (we used three different colors)
  • Spoon
  • One saucer size paper plate
  • One regular size paper plate
  • Three white eggs

Watch the video below to see my son doing the Colorful Egg Drop Experiment. This video comes from his YouTube channel, Corban’s Fun Learning Adventures. Please like and subscribe!

Have fun with this activity!

OUR KID FRIENDLY FAST & FUN STUDY TRICKS FOR BETTER GRADES: 9 FUN STRATEGIES FOR SUCCESS IN LEARNING AND SCHOOL HAS $29 OFF THE ORIGINAL PRICE.

Our books are available on Amazon, “Teach Your Toddler to Read Through Play,” “Fun Easy Ways to Teach Your Toddler to Write, and “Teach Your Child About Money Through Play.“

THE TEACH YOUR TODDLER TO READ THROUGH PLAY ONLINE COURSE HAS A $97 DISCOUNT.

Click here for the PAYMENT PLAN OPTION!

Soda Explosion for Kids

The Ultimate Experience

My son, Cory, loves science experiments because they provide the ultimate hands-on experience. Hands-on learning is the best way for children to be exposed to something new. It uses three of the child’s senses which are touch, sight, and hearing.

When doing science experiments, children are touching and seeing the materials they are handling and manipulating. Often times, they are working with others and hearing their friends’ conversations while adhering to the experiment’s directions.

Fun Explosions

Cory would agree that the best experiments have fun chemical reactions and explosions. A few that we like are Elephant Toothpaste, Egg Volcano, and Magic Balloon. We are always looking to add more to our collection. My son found the Soda Explosion in a book. This is a reaction between the carbonated beverage Coke and Mentos mints that causes the beverage to spray out of the bottle/container.

We made a tube with this experiment so the explosion would be more intense and higher.

This activity is simple and fun. It is a popular experiment right now. Let me show you how to do it.

Let’s Get Started!

Materials:

Watch the video below for directions and to see our Soda Explosion experience. This video comes from my son’s YouTube Channel called Corban’s Fun Learning Adventures. Please subscribe!

Why it works

  • Carbon dioxide molecules from the soda attach to the surface on the Mentos.
  • The mentos makes a lot of bubbles that rise and push the soda out.

Have fun with this activity!

OUR KID FRIENDLY FAST & FUN STUDY TRICKS FOR BETTER GRADES: 9 FUN STRATEGIES FOR SUCCESS IN LEARNING AND SCHOOL HAS $29 OFF THE ORIGINAL PRICE.

Our books are available on Amazon, “Teach Your Toddler to Read Through Play,” “Fun Easy Ways to Teach Your Toddler to Write, and “Teach Your Child About Money Through Play.“

THE TEACH YOUR TODDLER TO READ THROUGH PLAY ONLINE COURSE HAS A $97 DISCOUNT.

Click here for the PAYMENT PLAN OPTION!

Bubble Pipe for Kids

One day my son and I went to the Dollar Tree to buy pans for our next science experiment. While we were there, my son found a big bubble wand with a tray, and asked if we could get it. I told him “yes” because it looked like fun.

I thought we could incorporate science into the bubble play by making our own bubble solution. When we got home, he could not wait to try out his new wand. He also suggested that we try other bubble wands as well. We looked around the house and got pipe cleaners, a straw, tape, and paper.

We took the materials and attempted to make bubble pipes with three different materials. They were simple to make and fun to use. We stayed outside for over an hour playing. The various wands we used made the bubble play interesting and engaging. I will show you what we did below.

Learn how we made giant bubbles by viewing the video below… (this is from my son’s YouTube channel called Corban’s Fun Learning Adventures).

Let’s Get Started!

Materials for Bubble Pipe:

  • Small piece of writing paper
  • Small piece of parchment paper
  • Small piece of Aluminum foil
  • Straws (3)

Materials for Bubble Solution:

  • Water
  • Glycerin
  • Dish Soap (we used Dawn)

Directions for Bubble Pipe

  • Take the small piece of writing paper, roll it around one side of the straw, and tape it.
  • Take the small piece of aluminum foil, roll it around one side of the straw, and tape it.
  • Take the small piece of parchment paper, roll it around one side of the straw, and tape it.
Here is the small piece of aluminum foil.
My son rolling the writing paper around one side of the straw.
My son rolling the aluminum foil around one side of the straw.
Pictured are three straws with writing paper, parchment paper, and aluminum foil around one side of the straw. It is secured with tape.

Now is it time to make your bubble solution.

  • Mix 1 part dish soap, 4 parts warm water, add a teaspoon of glycerin, and stir well.
  • Stick either the writing paper, aluminum foil, or parchment paper straw in the bubble solution.
    • Put with the writing paper, aluminum foil, or parchment paper side of the straw in the bubble solution.
This is our bubble solution.
  • Blow on the straw (opposite side of the paper or aluminum foil.
You can see a bubble forming while my son is blowing.
Here’s another bubble forming.

Watch the video of my son using the bubble pipe made with writing paper.

IMG_3470bubble-pipe
Here is the bubble wand we purchased from Dollar Tree.

Other Tips

  • If your bubble solution is not working, add more dish soap and/or glycerin.
  • You will have a better chance of making bubbles if you blow through the straw slowly.

Have fun with this activity!

OUR KID FRIENDLY FAST & FUN STUDY TRICKS FOR BETTER GRADES: 9 FUN STRATEGIES FOR SUCCESS IN LEARNING AND SCHOOL HAS $29 OFF THE ORIGINAL PRICE.

Our books are available on Amazon, “Teach Your Toddler to Read Through Play,” “Fun Easy Ways to Teach Your Toddler to Write, and “Teach Your Child About Money Through Play.“

THE TEACH YOUR TODDLER TO READ THROUGH PLAY ONLINE COURSE HAS A $97 DISCOUNT.

Click here for the PAYMENT PLAN OPTION!

8 Number Toys/Materials for Toddlers

My son was able to recite the numbers 1-10 at 17 months. I remember him sitting in the high chair, waiting for his dinner to cool down, saying the numbers as I held my fingers up.

He did not learn with flashcards. He learned with natural and playful exposure. I wanted to ensure he used three of his senses, which were sight, hearing, and touch, when learning the numbers. It was important for him to see, hear, and touch them. It is possible to incorporate the sense of taste by making number cookies.

I will show you the educational toys for toddlers we used to naturally expose my son to numbers in a fun way. Additionally, there are explanations in how we used each toy or material.

Let’s Get Started!

Number Puzzles

  • My son liked these types of puzzles because he was able to touch the numbers.
  • Whenever he picked up a number, I would identify it.
  • We would put them in order forwards and backwards.
  • I also loved to hide them around the room and he would bring them to me.
    • After he gave me the number, I would identify it until he could do it himself.
  • Here are more options for number puzzles.

Play-Doh

Magnetic Numbers

  • My son liked playing with these numbers on the refrigerator while I was cooking or preparing a snack.
  • He sometimes would mix the numbers up and ask me to identify them.
  • He liked to hold up a certain number and have me tell him its name.
  • We would make up songs about the order of the numbers.

Flexi Rods

  • I know this is not a toy but a hair product.
  • We used this as a toy by bending them to make numbers.
  • I have these at home but never used them.
  • It is also a great hand strengthening activity for kids to prepare them for writing.

WikkiStix

  • We used WikkiStix to form numbers.
  • WikkiStix kept my son busy during a two-hour church service.
  • After making numbers, we liked to make up stories about the numbers.

Leapfrog Learn and Groove Musical Mat

  • This toy brings a physical component to numbers.
  • This number instructs kids to step on a certain number while doing silly movements.
  • My son and I loved racing each other to get to certain numbers.
  • The music, colors, and commentary makes learning about numbers fun.

Mark D Pencil Learning with Hip Hip Educational Lessons

  • Turn your car into an educational vehicle with this music.
  • We like listening to this album in the car.
  • It was a natural way for my son to learn how to count from 1-100.
  • After hearing the number song many times, you will hear your child sing them while playing.

Children’s Books

  • During our weekly trips to the library, I would get different number books.
  • Reading various number books to your child will help them remember it in a natural way.
  • They will get various perspectives on numbers from different authors’ points of view.
  • We read over 60 number books.
  • Below are five number books my son enjoyed…

Have fun with these learning toys for toddlers!

OUR KID FRIENDLY FAST & FUN STUDY TRICKS FOR BETTER GRADES: 9 FUN STRATEGIES FOR SUCCESS IN LEARNING AND SCHOOL HAS $29 OFF THE ORIGINAL PRICE.

Our books are available on Amazon, “Teach Your Toddler to Read Through Play,” “Fun Easy Ways to Teach Your Toddler to Write, and “Teach Your Child About Money Through Play.“

THE TEACH YOUR TODDLER TO READ THROUGH PLAY ONLINE COURSE HAS A $97 DISCOUNT.

Click here for the PAYMENT PLAN OPTION!

Walking Water Experiment for Kids

“Can we do a science experiment?” This is what my 4-year-old son, Cory, asked me while walking in the grocery store one day. We just passed the aisle with vinegar, which is an item we use for many of our experiments. A week before, we did the Tooth Decay Experiment, which taught my son the importance of brushing his teeth twice a day. He had a lot of fun with this experiment and wanted to have that same feeling again.

So I turned to him and said, “Sure we can do another experiment. Do you know what experiment you want to do?” His reply was, “No, but we can look one up.” We did just that the next day and found the Walking Water Experiment. I was familiar with how to do it without instructions. However, I wanted my son to read the experiment instructions and follow directions. Science experiments are a great way to increase a child’s reading level.

Watch the video below to see how science experiments can increase a child’s reading level.

We looked in our kitchen for the materials needed to do the Walking Water Science Project. We had everything except food coloring. Cory was so excited to do the experiment that he requested we go to the grocery store to get it. When my son is excited to learn something new, I try to act on it as fast as I can. After we got home from the grocery store, we were ready to get started.

This is an amazing experiment to show how water can defy gravity with a capillary action. I will explain this at the end of the post.

Let’s Get Started With This Fun Rainbow Experiment!

Materials Needed:

  • Water (enough to fill seven glasses)
  • Seven drinking glasses
  • Food coloring (we used blue, red, yellow, and green)
  • Spoon for stirring
  • Paper towels (six folded into a rectangular shape)

Directions:

  • Fill four glasses with water.
  • At first we only filled the glasses halfway, then we realized it is best to fill them up.
Cory pouring water in the glasses
  • Put a different color of food coloring in each glass.
Putting the food coloring in each of the four glasses.
  • Stir the food coloring and water in each glass.
Mixing the food coloring and water together.
  • Place the glasses so there is an empty glass in between the ones with food coloring.
Alternating food coloring glasses with empty glasses
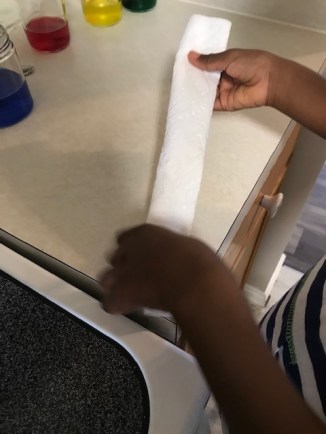
  • Fold six paper towels into a skinny rectangular shape.
Fold the paper towel like in the picture shown above.
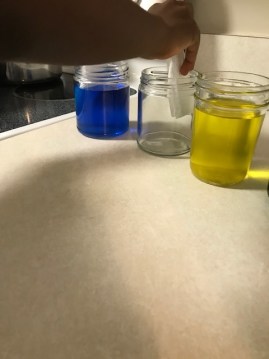
  • Insert paper towels into two glasses placed beside each other.
Placing paper towels in cups. Here you can see we put more water in the glasses.
This is how the paper towels should look. There should be two paper towels in each glass.
The task is complete!
  • Let this sit for 24 hours and watch what happens.
This is what we saw the next day.
  • The empty glasses now had colorful water in them.
  • The glasses that were once full are now only a quarter full.
  • The water seeped through the paper towels and put water in the empty glass next to it.

Why this works:

  • As soon as you place the paper towel in the glasses, you should see that the it starts to absorb some of the water.
  • Water goes up the paper towel and defies gravity in a process called capillary action.
  • Paper towels are made of many small fibers that have gaps in between them.
  • Water gets pulled into these gaps by capillary action.
  • The water goes up the paper towel and down into the empty glass.
  • This is how water moves through plants.

Watch the video below to see how we did the experiment in real time. This video comes from my son’s YouTube channel, Corban’s Fun Learning Adventures. Please like and subscribe for fun learning adventures.

Try this fun experiment at home. Enjoy!

OUR KID FRIENDLY FAST & FUN STUDY TRICKS FOR BETTER GRADES: 9 FUN STRATEGIES FOR SUCCESS IN LEARNING AND SCHOOL HAS $29 OFF THE ORIGINAL PRICE.

Our books are available on Amazon, “Teach Your Toddler to Read Through Play,” “Fun Easy Ways to Teach Your Toddler to Write, and “Teach Your Child About Money Through Play.“

THE TEACH YOUR TODDLER TO READ THROUGH PLAY ONLINE COURSE HAS A $97 DISCOUNT.

Click here for the PAYMENT PLAN OPTION!

Tooth Decay Experiment: Teach Kids the Importance of Brushing their Teeth

I love doing science experiments with my son. One reason is that they help children become better readers. Also, they provide learning that is hands-on and uses the three senses of sight, hearing, and touch (sometimes smelling and tasting as well). They are the best way children can apply what they are learning.

In the past, I have used science experiments to teach my son lessons in hygiene such as the importance of washing his hands. The activity I will show you today is a great complement to that experiment. It is called the Tooth Decay Experiment. This could be your child’s next science fair project (for older kids).

The Tooth Decay Experiment will show your children the importance of brushing their teeth twice a day. Furthermore, it demonstrates what happens to your teeth when you drink certain beverages such as orange juice, tea, and water.

We have fun with all our experiments; even those that don’t work. It gives us opportunities to investigate and solve problems. I tell my son this is what scientist do!

The Tooth Decay Experiment has made my son a “Flossing and Teeth Brushing Advocate!” After you do this activity, it will probably have the same impact on your child. I will show you how to do it.

Let’s Get Started!

Warning: This post contains a lot of pictures.

Materials:

  • 5 cups (we used paper cups)
  • 5 individual labels that read: Orange Juice, Soda, Water, Tea, and Vinegar
  • Scissors
  • Tape
  • 5 Eggs
  • 1 cup of orange juice (enough to submerge an egg)
  • 1 cup of dark soda (enough to submerge an egg)
  • 1 cup of water (enough to submerge an egg)
  • 1 cup of tea (enough to submerge an egg)
  • 1 cup of vinegar (enough to submerge an egg)
  • Toothbrush
  • Toothpaste
  • Plastic Gloves to protect hands
  • Goggles to protect hands

Here is a video of my son doing the Tooth Decay Experiment. This video comes from my son’s YouTube Channel, Corban’s Fun Learning Adventures. Please like and subscribe for fun activities.

Directions:

  • Make 5 individual labels that read: Orange Juice, Soda, Water, Tea, and Vinegar
My 4-year-old son is learning how to write in cursive. To my surprise, he wrote the labels in cursive.

If you want to know how my son learned to write the alphabet and numbers as a 2-year-old through PLAY, click this link.

  • Cut the labels out and put them on the cups.
My son putting the labels on the cup.
The labels are on the cups.
  • Put the eggs in each cup.
My son putting the eggs in the cup.
  • Pour the liquids in each labeled cup.
Pouring the dark soda in the cup.
  • Let the eggs sit in the cups for 24 hours.
Our eggs are sitting overnight on the kitchen counter.
  • The next day take the eggs out of the cups and see what happened.
The egg in the water stayed the same. So we concluded that water is healthy for your teeth.
This egg was in water. It was clear and maintained its color.
This egg was in the orange juice. It was slimy and we could see the sugar from orange juice on the egg.
This egg was in the dark soda. The soda stained the egg brown. This is how soda stains our teeth.
This egg was in the tea cup. It was stained brown like the soda.
This egg shell was in vinegar. It made the shell soft and squishy.
My son brushed the egg shell that was in soda with toothpaste.
After brushing the egg shell it was starting to become white again. This is what happens when we brush our teeth.

This experiment had a big impact on my son. He knows that brushing his teeth is important. After doing this activity, he said he wanted brush his teeth everyday.

Try it at home and have fun!

OUR KID FRIENDLY FAST & FUN STUDY TRICKS FOR BETTER GRADES: 9 FUN STRATEGIES FOR SUCCESS IN LEARNING AND SCHOOL HAS $29 OFF THE ORIGINAL PRICE.

Our books are available on Amazon, “Teach Your Toddler to Read Through Play,” “Fun Easy Ways to Teach Your Toddler to Write, and “Teach Your Child About Money Through Play.“

THE TEACH YOUR TODDLER TO READ THROUGH PLAY ONLINE COURSE HAS A $97 DISCOUNT.

Click here for the PAYMENT PLAN OPTION!