It is warm outside and kids are going to the beach (where there is salt water) and the pool. Some kids may notice that they float better in salt water than in fresh water. After doing this experiment, your child will know why this occurs. Explore the difference in density between salt water and fresh water with this easy experiment.
Let’s Get Started!
Materials:
2 Glasses of Water
Salt
Spoon
Food Coloring
Ice
Materials for Salt and Fresh Water Experiment
Method:
Place a few ice cubes into one glass of water
Placing ice in fresh water
Add a few drops of food coloring into the ice water.
Adding green food coloring into the ice fresh water.Observing how the green food coloring disperses into the fresh water.
Add several tablespoons of salt to the other glass of water and stir so it dissolves.
Add some ice cubes to the salt water glass.
Pouring salt into the other glass of fresh water
Add food coloring to the salt water and see what happens.
Adding food coloring to the salt waterThe salt is causing the food coloring to float.
Compare the food coloring in the fresh and salt water.
Observe the difference.
Why it Works:
Saltwater is denser than fresh water because the sodium chloride is dissolved in it.
Specific amounts of salt water is heavier than the same volume of freshwater.
When salt is dissolved in water, like at the ocean, the salt adds to the mass of the water.
The salt makes the water denser than it would be without the salt.
When salt is dissolved in water, as it is in ocean water, it adds to the mass of the water and makes the water denser than it would be without salt. Because objects float better on a dense surface, they float better on salt water than in fresh water.
Colors is a topic that all kids learn. My son learned his colors around 16 months with a combination of fun activities. I remember spreading out various colored poms poms on the floor and asking him to bring me specific colors. He got them all correct! He learned because I used in-depth fun learning to naturally expose him to it. In-depth learning is exposing your child to new concepts in various ways such as sight, hearing, and touch. The activities below will help you incorporate these types of learning techniques.
Let’s get started with learning colors in a fun way!
Sorting
Sorting is a great way for kids to learn colors. Below are some ways to accomplish this at home.
Gather various colored items in your home such as blue, yellow, green, purple, red etc.
Help your child to put all items of the same color together.
For example put all the red items together.
My son, Cory, likes to sort his toy cars and balls.
Make a game of it by racing all the green cars, then blue cars, and so on.
You can also create a ball race between the various colors.
My son sorted balls and made each Black Panther Action Figure guard them.
Color Day!
Pick a color day in your household.
Pick a day where everyone in the family wears the same color clothes.
Everyone can wear the same color shirt, pants, or socks.
This activity is like St. Patrick’s Day where everyone wears green.
However, you will pick a different day of the week to wear a certain color.
For example, on Monday everyone wears a blue shirt and then on Tuesday everyone wears a red shirt.
These children are having a Blue Day!
Pick the Color
This activity was actually how I found out my son knew all his colors. This is a fun one for the kids.
Ask your child to bring you various colored items. For example say to your child…
“Please give me the blue poms poms”
“Please bring the yellow poms poms”
Optional: you may alternate roles with your child and have them ask you to bring them certain colored poms poms.
Call It in the Real World
Children don’t have to be in school or at home to learn colors. It can be done anywhere. Try the activities below…
While you are outside, pick a color you will identify such as green.
Identify with your child green grass, cars, and tree leaves
While running errands, identify various colors on signs or advertisements
While at the grocery store, identify various colors of fruits and vegetables.
Color Hunt
This activity encourages children to get physical and learn simultaneously.
Hide the same color items in one room or all over your home.
Have your children find the items you just hid and identify the colors.
Optional: You may hide different color items around your home as well.
Digital Media
My son and I love watching educational videos on our television. At times after dinner, we dance, sing songs or just watch videos about colors from YouTube. Below are YouTube videos about colors.
Being able to use colors to create pictures is a great learning tool for children.
Once your child learns certain colors have them paint a picture using that color.
You may also create stories using the picture.
For example, paint a yellow stick man playing with a blue stick man and write a story about it.
My son’s finger paint art work of the beach.
Make Color Potions
Making potions is a great hands-on activity for kids. Below is how to do it.
Make a simple potion by mixing glitter, various food coloring, vinegar, and baking soda.
Your child will see bubbles while creating this chemical reaction.
My son making a colorful potion.
Make Slime
Mix water, cornstarch and washable paint until it feels like glue.
You may use food coloring instead of paint.
Let your child play in the slime.
Red Corn Starch Slime
Books with Movement
Before my son knew the colors, I would go to the library weekly and get books about colors. Reading a variety of books about colors helped my son see colors from many perspectives. Don’t just read books, but get physical as well. Once you read about a color in the book, look around the room or your home and try to find that color.
Below are 10 great books to read to your child about colors
The Melissa and Doug Sort and Snap Color Match was given to my son as a birthday present. Your child will be able to create various colorful pictures using boards and snap caps. It is an interactive educational tool that is great for color recognition, sorting, and beginning math skills. Cory liked creating the pictures. It is a good way to supplement your child’s exposure to colors.
Cory completed a picture of a caterpillar with colors.
One day, I was looking at the book, Crafty Science by Jane Bull. It has a bunch of STEAM projects for children to create at home. I showed my son the Invisible Ink activity and he said “Let’s do that mommy.” We looked around the house and gathered the materials.
I thought this would be a great drawing and writing activity for my son. He ended up writing numbers. This is a great project to expose your child to literacy and science. If your child is learning how to read, write words that will challenge them to use phonics or sight words. The science in this project is explained at the end of this post.
Let’s Get Started!
Invisible Ink
Materials:
Lemon
Bowl
Paintbrush or Cotton Swabs
Paper
Iron (for adult use only)
Materials for Invisible Ink Activity.
Method:
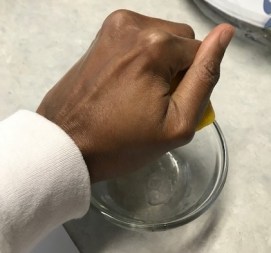
Squeeze a lemon into a bowl
Write your secret message on the paper in lemon juice using a paintbrush or cotton swab.
Draw quickly in order to check your work before it dries. It does not have to be as dark as the picture below. My son insisted on going over the numbers numerous times so he could see it.
To get the message, an adult should iron the paper with a hot iron until the message comes through
Warning:
This activity may stain your iron with brown spots. This happened to me. I was able to get my iron squeaky clean by following the video below.
Why this activity Works:
This works because lemon juice is an acid.
When it is put on the paper, the acid destroys some of the paper surface.
When you heat it up with the iron, the areas with the message turn brown first.
Milk also works with this activity because it is slightly acidic.
My son loves to play, build, and race his toy cars. One day, I asked him if he wanted to have a car wash after seeing this activity on the Internet. I remember looking at this activity and thinking this would be a great idea for a kid who likes cars.
I had several reasons for suggesting the car wash. First, this activity was a fun way to encourage my son to practice his penmanship. The weekend we did the activity, it was raining. I was trying to find something hands-on to do in the house; although, a car wash is really fun when doing it outside on a sunny day. Furthermore, I wanted to incorporate three things that interest my son which are cars, counting, and getting messy.
Our Car Wash incorporated fun and so many aspects of hands-on learning. I thought I would share this activity with you so your kids can have as much fun as my son.
Check out our new book available on Amazon, Teach Your Child About Money Through Play! It has over 110 Games/Activities, Tips, and Resources. The book is great for kids ages 4-10 and their parents.
Let’s Get Started
Materials:
Big sheet of poster board or white craft paper
Toy Cars
Markers
Painters Tape
Towels (3)
Wash Cloth
Cash Register or Play Money (You may also make your own play money)
Two Rectangular Plastic Containers
Water
Dish Detergent
Some of the materials for the Car Wash
Preparation:
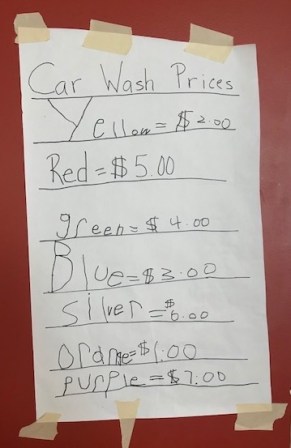
Have your child decide the Car Wash Prices.
If your child can write, have them write the car wash prices on the poster board or white craft paper.
My son decided to give each color car a different price.
If your child can’t write, you may create the Car Wash Price Sign for them.
You may have your child draw the various colored cars on the sign.
I created a template on construction paper to assist my son in organizing the Car Wash prices on the white craft paper.
My son writing the Car Wash Prices using the template I created on pink construction paper.Continuing to write the pricesCar Wash Price Sign is complete.
Tape the Car Wash Prices to a wall where it is visible for customers.
Car Wash Prices taped to the wall.
Get the toy cars, cash register, wash cloth, and towels
Lay the towels on the floor if you are doing this in your home.
If you are outside, then you can skip this step.
Fill one rectangular plastic container with dish detergent and water halfway.
This is where you will wash the cars
Fill the other rectangular plastic container with water.
This is where you will rinse the cars.
Now the Car Wash can Begin!
Have your child role play the Car Wash owner.
You or your child’s siblings and/or friends can play the customers.
As a customer, get some play money so you can pay to get your car washed.
I started off with $30.00 divided into (10) one dollar bills, (2) five dollar bills, (1) ten dollar bill
My son giving me money to start the Car Wash Activity.
Have your child say the following:
“Welcome to the Car Wash, how may I help you?
You will respond by saying the following…
Yes, I would like to have my yellow cars washed please.”
Then your child will look at the poster they made to see how much it costs to wash the yellow cars.
On our poster, it costs $2.00 to wash the yellow cars.
I had three yellow cars, so I gave him $6.00 with (1) five dollar bill and (1) one dollar bill
Exchanging money during the Car Wash Activity
Sometimes I gave him more money than the cost of washing the car so he could practice his subtraction skills and give me change.
After giving my son the money, he took the cars and washed them.
He washed them in the soapy water container and then put them in the container with water to rinse.
Next he put them on the towel to dry.
My son washing the cars.My son rinsing the cars.
We kept repeating these steps until all the cars were washed.
Another time we did this activity, I was the Car Wash Owner.
We have also done this activity where my son was the Cash Wash Owner for the red cars but I was the Cash Wash Owner for the blue cars.
In other words, we were alternating roles.
Tailor this activity to your child’s ability by doing the following…
Have your child wash only one car at a time so they don’t have to do any subtraction or addition.
Only give your child one dollar bills so they can practice counting by ones.
Make all the car wash prices the same to make things easier.
View the video below to see us do this activity in real time. This video comes from my son’s YouTube channel, Corban’s Fun Learning Activities. Please like and subscribe for fun learning activities.
Subjects Learned in this Activity
Color Recognition
Sort the cars by colors.
Make different prices for each color car.
You may also have a car wash with one color car like the red cars.
Math
Adding the costs to wash multiple cars.
Subtracting when the customer gives the Car Wash Owner too much money and change is needed.
Multiplying the cost when multiple cars with the same price are needed to be washed
Science
We had some cars that would float in the water and some that would not
We discussed that cars with less density than the water will float.
Cars with more density than the water will sink.
We reviewed the word buoyancy, which is the ability to float in water.
You may discuss the science of soapy water and how it cleans the cars.
Soap attaches to dirt and grease and causes it to be pulled off the toy cars and suspended in the water
Writing
My son was able to practice his handwriting skills in creating the Car Wash Price Sign.
Customer Service
Teach your child the importance of being nice and respectful to their customer.
Also ensure your child knows to clean the cars well so the customer is happy.
If the customer is happy then they will bring more customers.
Entrepreneurship
Explain to your child that Entrepreneurs own businesses and their purpose is to solve problems or make things better.
A great business has happy customers who will tell others about their service or product.
Take your child to a real Car Wash and show them it is a Real Business.
Have fun with this activity and make this your own!
Spring is here and many kids are helping their parents and teachers grow plants and flowers. One of the most important jobs in growing plants is to water them regularly. My son helps my husband water the garden. As a result, by July, we have vegetables such as cucumbers, tomatoes, and green beans.
This Celery Experiment is great way to show kids how plants get water from their roots up to the leaves. At the end of the post, I will explain why this experiment works.
Let’s Get Started!
Materials:
Glass Jar or Drinking Glass
Celery
Water
Food Coloring
Knife
Materials for Celery Experiment
Method:
Gather the materials
Cut about one inch off the bottom of the celery stalk.
Here I cut about one inch off the bottom of the celery.
Fill the drinking glass halfway with water.
Put a few drops of food coloring into the drinking glass.
Putting drops of food coloring into glass
My son chose to put red and blue food coloring in the glass.Mixing the food coloring together
Place the celery stalk in the colored water and let it sit over night.
We put the celery in the glass
Rip open the celery to see how the color travels throughout the stalk
Food coloring on the celery’s rib.
You should see that the food coloring has traveled to the leaves.
The food color traveled to the celery’s leaves
Why it works:
When you water a plant, the roots absorb the water from the soil.
The tiny tubes in the celery or plant stem, called xylem, draw the water up from the roots like a straw.
This process is called Capillary Action.
Capillary Action happens when water climbs up the tiny tubes.
The water droplets stick to the walls of the tubes and go upward.
The water sticks to itself and pulls more water as it climbs up.
Capillary Action lets water climb up to the various parts of a plant through the xylem tubes in the stem.
Many parents are successful at teaching their children manners through modeling the behavior or reminding kids to use them. This post brings a fun, hands-on approach to teaching manners. The games/activities below can be a supplement to what you are already teaching your children at home. These are great group activities to play with young kids. I hope you find these helpful!
Let’s get started!
Please and Thank You Game
The following game will teach your child when to say Please and Thank you.
Materials Needed:
3 Stuffed Animals or 3 Action Figures
Tape
Paper
Scissors
Explain to your child that Please should be used with any request such as…
When your child wants a drink
They should say “May I PLEASE have a drink?”
If the child is very young then they can say “Drink, please.”
Explain to your child that Thank you is used when they receive an item, favor, or an act of kindness.
For example, children should use it when someone gives them a drink, a gift, or when they have visited someone’s home.
Start the activity by having your child gather their stuffed animals and action figures.
Cut 3 rectangles out of the paper.
Write the word, Doing, on one rectangle and then tape it on the front of one stuffed animal or action figure.
The Doing toy’s job is to role play the scenarios with your child.
Write the word, Thank you, on one rectangle and then tape it on the front of one stuffed animal or action figure.
The Thank you toy’s job is to say Thank you in the scenario if needed.
Write the word, Please, on one rectangle and then tape it on the front of one stuffed animal or action figure.
The Please toy’s job is to say Please in the scenario if needed.
Create four scenarios where the child will have to role play and identify when to use Thank you or Please like the examples below…
The Doing Toy just shared his snack with your child. (Answer – say Thank you)
The Doing Toy would like a banana. What should the toy say? (Answer – May I please have a banana?) (Another option is Banana please).
Your child spilled the Legos on the floor and the Doing Toy helped your child clean up. (Answer – say Thank you)
The Doing toy wants to play at the playground. What should the toy say? (Answer – Can you take me to the playground, please?)
Role play the scenarios above (or scenarios you have created) one at a time with the toys and your child.
Below is an example of how the role play should be played. Let use the first scenario as an example..
The child and Doing toy should role play the following scenario – The Doing Toy just shared his snack with your child.
Now the child should decide if the Thank you toy or Please toy is needed.
In this scenario, the child should get the Thank you toy to say Thank you to the Doing toy.
If your child is confused about whether to use the Thank you toy or Please toy help them to determine the correct answer.
Repeat steps 9-10 with the scenarios given in number 8. You may also create your own scenarios.
The Manner Animals
Super V!
This activity gives kids a reminder to cover their mouths when they cough and sneeze.
Material Needed:
The child’s arm
Explain to your child that it is important to cover their mouths when they cough or sneeze to prevent the spread of germs.
Germs can cause others to get sick.
The best way to stop the spread of germs is to cover your mouth and nose with a tissue.
If you don’t have time to get a tissue, then use SUPER V!!!
SUPER V is when you cough and sneeze into the inner crease of your elbow.
When do you this, your arm forms the letter V.
Pretend that you are sneezing or coughing and model to your child how to cover their mouth.
As you model how to cover your mouth, say SUPER V like it is a superhero!
Have your child practice saying and doing the SUPER V mouth cover position.
Every time your child really coughs or sneeze, say SUPER V!
If your child is not into superheroes then create something else like the PRINCESS SHIELD to help them remember to cover their mouths.
Sick child doing the Super V
Excuse Me Game
This game will teach your child when it is appropriate to say Excuse Me.
Materials Needed:
Something that makes a loud noise like a bell, drum, whistle, or kazoo
Child’s stuffed animals, action figures, or other toys
Explain to your child that Excuse Me should be used in the following situations…
To get another person’s attention
When you need to get around someone and they are in your pathway.
When you have bumped into someone or accidentally stepped on their foot.
During an acceptable interruption
For example, if mom is talking to someone and the young child needs to go to the bathroom.
When you burp or pass gas
After explaining step 1, role play the situations with your child (using yourself and child as the actors for practice).
Next get your child’s toys.
Give your child a loud noise maker of your choice such as a bell, drum, whistle, or kazoo.
Use the child’s toys to role play each scenario in number 1 and scenarios where Excuse Me is not needed such as…
You give your child a snack.
Your child wants to go outside and play.
After role playing each scenario with the toys, give the child two choices in which to respond…
If saying Excuse Me is an appropriate response to the scenario, then the child should use their noise maker and next say Excuse Me.
Is Excuse Me is NOT the appropriate response to the scenario, then the child can say NO!
For example, you role play that one action figure burps and your child has a drum.
The child should play the drum and then say Excuse Me.
Keep playing the game with various scenarios.
No Interruptions Game
This activity uses the concept of Shaping to teach kids to be patient while parents are talking to others in person or on the phone. Shaping is a technique many counselors use to teach kids new behaviors or skills. It allows you to build a desired behavior in children using small steps. Once the child has mastered a step, then move to the next one.
Materials:
One of the child’s stuffed animal, action figure, or other toy
Timer
Pretend or toy telephone
Explain to your child that interruption is when they talk while someone else is talking.
Interrupting is considered rude unless it is an acceptable interruption such as…
You have to go to the bathroom
You or someone is hurt.
Some kids interrupt their parents for attention or they think the conversation topic with the other adult is boring.
Start the No Interruptions Game by getting your child’s toy and the telephone.
Tell your child they can’t talk to you until the timer goes off.
If this is a struggle for them, suggest ideas to keep them busy like counting, playing with a toy, or just listening.
Set the timer to 20 seconds.
Pretend you are on the phone while the timer is going.
After the times goes off, tell your child they can talk.
If your child does NOT interrupt you within the 20 second period, then next time increase the time to 30 seconds and so on.
Do this until you get to a desired time like 5 minutes.
If your child talks to you before the timer goes off, then try the activity again with the timer set to a lesser time like 10 seconds and work from there.
April is financial literacy month. I wanted to start the month off by giving you fun and simple financial literacy activities to do with young children.
Robert Kiyosaki, the author of Rich Dad Poor Dad said when you are an adult your report card is your credit score. This is one reason why teaching kids financial literacy is so important. Once a child becomes an adult, handling money becomes inevitable. So, let’sstrive to build an early foundation for our children!
Check out our new book available on Amazon, Teach Your Child About Money Through Play! It has over 110 Games/Activities, Tips, and Resources. The book is great for kids ages 4-10 and their parents.
As the customer, start by giving your child the correct amount of money for the ice cream.
Once they become more advanced, give them more than enough money and help them determine the correct change to give you.
This is also a great activity to teach your child about kindness and customer service.
My son giving me change after my ice cream purchase.Ice Cream Cones made from PlayDoh
Monopoly
Introduce your child to investing in real estate with this game. Use this game to teach your child financial literacy vocabulary such as Assets, Liabilities, and Transaction.
Life Skills is something that many parents teach their children. It helps them navigate through the real world. Incorporating math in life skill lessons is important because it helps people, including children, to describe how the world works.
For example, a child knows that if he/she has one cookie and their sibling has two cookies then there is a difference. If a child has played with a toy for 5 minutes and another child played with it for 15 minutes, they can feel the discrepancy.
In the examples above, children are using mathematics on deciding how they should feel about certain situations. As adults, let’s encourage and foster their learning by building on their knowledge of using everyday math.
These activities below will show you how to do it in a fun way with your children!
Check out our new book available on Amazon, Teach Your Child About Money Through Play! It has over 110 Games/Activities, Tips, and Resources. The book is great for kids ages 4-10 and their parents.
Let Get started!
Everyday Math at the Grocery Store
Take your child with you to the grocery store.
Have the child pick a food item they would like to pay for.
It could be their favorite food to eat such as apple sauce.
Give the child more than enough money to pay for the item they choose.
Account for taxes
If the apple sauce costs $2.00, give them $4.00.
Ensure the child gets the correct change back.
Explain to the child that food costs money.
The extra money added on to the prices is for taxes which helps pay for schools, roads, and parks.
Explain how you got the money by going to work, starting a business, etc.
Repeat this activity and incorporate more food items.
Once your child is able, have them calculate their change.
They can also calculate how much money is needed to pay for the item.
Everyday Math in the Kitchen
Find a recipe, such as brownies or cookies, that uses measurements such as teaspoons, tablespoons, and cups (or any measurement you use for cooking).
Have measuring spoons and cups available to represent the teaspoons, tablespoons, ounces and cups.
Have the recipe and ingredients available.
Make the baked goods with the child.
Discuss the difference between 1/2 and a full cup (use the equivalencies below to help with the explanation).
Put a 1/2 cup of flour in 1 cup to show that it only fills up 1/2 the cup.
Explain the difference between tablespoons and teaspoons (use the equivalencies below to help with the explanation).
Put 3 teaspoons of flour in 1 tablespoon to show that 1 tablespoon is 3 times 1 teaspoon.
Compare other measurements based on the chart below.
My son, like most young kids, loves to do activities that are hands-on. We have tackled a number of building activities from playing with Legos and Magnetic Tiles to Bristol Blocks.
When I realized that we had the opportunity to make our own 3-D paint, I became excited. However, my son had to sign off on the project. When he saw that we could make our own paint from scratch, he was all for it.
I like this activity because we had all the ingredients in the kitchen. Also, it was a great opportunity to practice writing and incorporate literacy in a fun way!
So let’s talk about our exciting scientific art experiment!
How to use this project to increase your child’s reading and writing skills
The project below will provide a fun and educational hands-on experience for kids. It is called the 3-D Puffy Paint Project and can encourage children to practice writing letters and numbers. This activity can be used to create stories and during pretend play. Additionally, constantly squeezing the paint out the bottle is a great hand strengthener to prepare kids for writing.
My son created a story while doing this project. The story was about a monster who played with friends. The monster started playing with one friend and then as time went on, the amount of friends grew exponentially. By the end of the story, the monster played with over 100 friends. We learned the words exponentially, introduce and exhausted, while doing this activity.
I exposed my son to new words by retelling the story. After my son told me the story, I said the following…
Me: So you are telling me that this story is about a monster who played with one friend at the playground. Then he kept meeting more and more friends as the day went on. This means his friends grew exponentially from 1 to over 100. Right?
My Son: Right
Me: As they were playing, he became very tired or exhausted. So how did he meet all those friends?
My Son: He went up to friends and said, “My name is Monster, do you want to play?”
Me: Oh, so the monster introduced himself to the new friends, and then asked them to play.
My son: “Yes, Yes, that’s right!”
Quick Tip: Use the new vocabulary as you are casually talking to your little one so they will internalize the information.
Another way to make this project literacy based is to have your child read the directions on this post while making the puffy paint. Encourage your child to sound out or say words that they know if they are beginning to read. If they can’t read yet, help them to use the pictures in this post to show how to make the paint. Your child will be reading because they are interpreting meaning. Additionally, read the instructions to them while following along with your finger so they see that words are needed in order to make the paint.
Now Let’s Make Paint that is 3-D!
Ingredients:
2 Tablespoons Flour (30 ml)
2 Tablespoons Salt (30 ml)
2 Tablespoons Water (30 ml)
Small Bowl
Food Coloring
Squeeze Bottle
Cereal-box cardboard
Method:
Mix flour, salt, and water in the bowl.
Measuring the flour, salt, and water with a measuring spoon.
Mixing flour, salt, and water in a bowl.
Add two drops of food coloring.
Mixing in blue coloring
Pour mixture into the squeeze bottle.
Make a few colors by following the first three steps.
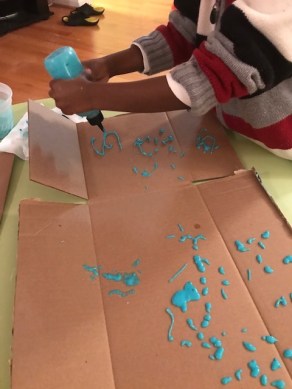
Squirt lines, curves, dots, and PICTURES on the cardboard.
My son is having fun with the puffy paint.
My son is narrating and illustrating a story about a Monster playing with friends.
Make this a fun literary activity by doing the following…
Paint or draw a picture and create a story about the image.
Have the child practice writing their name.
Have the child practice writing their letters or numbers.
Writing letters and numbers is a skill that many parents and teachers ensure their children possess. My son wrote his first letter, A, at 21 months.He revealed it to me through abstract artwork that left me in shock.
Now he is four-years-old and his writing has improved tremendously. However, I like to find ways to make writing appealing and fun for him. One way to do this is through making our household, when possible, our writing canvas. This means writing in the tub with bath time crayons or writing on our screen door with window markers.
Today I will show you how we used household ingredients to write and create art. The project is called Pan Frescoes. Frescoes is painting with watercolor on wet plaster on a wall or ceiling.
In this project, we make our wet plaster with cornstarch and water! Instead of painting on a wall or ceiling, we will do it in a pan. You may also choose to do this outside on concrete. Just remember to rinse it with a water hose when done.